The intricacies of a motorcycle’s electrical charging system are often underestimated, yet they play a pivotal role in ensuring your bike runs smoothly. When things go awry, diagnosing the electrical issues can feel akin to deciphering a cryptic code. This checklist provides a comprehensive examination of the motorcycle electrical charging system, empowering you to unravel problems swiftly and efficiently.
Understanding the Fundamentals of the Charging System
At the heart of this operation lies the charging system, fundamentally composed of the stator, rectifier, voltage regulator, and battery. The stator, an indivisible part of the engine, generates alternating current (AC) as the motorcycle runs. This AC is converted to direct current (DC) by the rectifier, then regulated by the voltage regulator to the proper voltage before charging the battery. Each component plays an irreplaceable role, and identifying their symptoms is crucial for a swift resolution.
The Stator: Analyzing Power Generation
The stator’s health is paramount; it imports raw power into the system. Begin by inspecting the stator connections for corrosion, fraying, or loose wires. Any sign of physical wear signals potential failure. Utilize a multimeter to measure the AC voltage output at the stator. An output below the manufacturer’s specifications indicates a malfunction, necessitating immediate attention. A well-functioning stator is your frontline defense against electrical turmoil, so a detailed examination here can reveal the first signs of distress.
The Rectifier: Converting AC to DC
Once AC is generated, it needs to be transformed into usable DC. This is where the rectifier shines, but it can often be the unseen culprit responsible for electrical anomalies. Examine the rectifier for burnt or damaged diodes. Implement a diode test with a multimeter to assess its integrity; a failed diode can lead to inadequate voltage reaching the battery. Ensure that the connections are clean and secure. A straightforward test at this juncture can save you a considerable amount of time and hassle later on.
Voltage Regulator: Maintaining System Balance
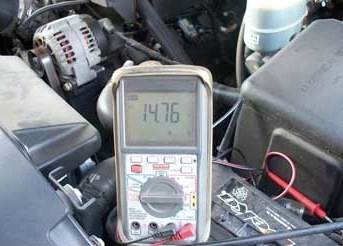
The voltage regulator serves as the custodian of electrical equilibrium, overseeing voltage levels to prevent spikes that could potentially damage the battery and connected components. To assess its performance, check the output voltage across the battery terminals while the engine is running. It should generally hover around 13.5 to 14.5 volts. Significant deviations from this range could indicate that the voltage regulator is underperforming. As a safeguard, also examine ground connections for corrosion or damage, as flawed grounding can skew voltage readings and lead to confusion in diagnosis.
The Battery: The Power Reservoir
No discussion of the electrical system is comprehensive without addressing the battery itself. Place emphasis on checking the battery’s state of charge and overall condition. A visual inspection is necessary; look for any swelling, leakage, or corrosion on terminal connections. A load test, which involves applying a load to the battery while monitoring its performance, is a definitive method to ascertain its condition. A battery that struggles to hold a charge may compromise the entire charging system, making it a paramount focus on your checklist.
Wiring Harness: The Unseen Pathways
Often overlooked, the wiring harness is the lifeblood of the motorcycle’s electrical system. Conduct a meticulous inspection for any signs of wear, frays, or disconnected wires. Continuity tests across the harness can also expose breaks that may not be visible to the naked eye. Be vigilant for signs of environmental damage, such as from moisture or heat, both of which can silently deteriorate your system’s integrity. The longevity of your electrical system hinges significantly on these hidden pathways.
Fuse Box: The Safety Net
Fuses act as the gatekeepers of your motorcycle’s electrical system, designed to blow when excessive current flows through. Check the fuse box for blown fuses and ascertain the cause of failure. A continuously blown fuse typically suggests a more profound issue—perhaps an overload or short circuit. Replacing fuses alone may offer a temporary fix, but it’s vital to delve deeper to diagnose the root cause of recurring issues.
Advanced Diagnostic Tools and Techniques
For those who seek a layered approach, investing in sophisticated diagnostic tools can vastly improve your troubleshooting efficiency. Oscilloscopes, for instance, allow for the visualization of electrical waveforms, revealing issues that multimeters may overlook. Advanced diagnostic tools can significantly enhance your ability to diagnose problems, transforming potential chaos into a comprehensible narrative of your motorcycle’s electrical health.
Wrapping Up: Staying Proactive
Regular checks of your motorcycle’s electrical charging system can prevent minor inconveniences from becoming substantial issues. By methodically approaching each component on this checklist, you nurture a better understanding of your machine, fostering a proactive rather than reactive mindset. With these insights, you become empowered—not just to maintain your motorcycle, but to ride with confidence, insulated from the fears of unexpected electrical failures.
By shifting your perspective and diving deep into the complexities of your motorcycle’s electrical charging system, you are not only ensuring the wellbeing of your bike but also enhancing your riding experience. Each diagnostic step reveals the inner workings of your machine, igniting a newfound appreciation for the art of motorcycle maintenance. Harness this checklist, and embark on your journey with the assurance that you possess the tools to tackle electrical issues head-on.