Ever stared at your chopper bike, its frame gleaming under the garage lights, and thought, “What if I could make my own pegs—ones that scream *you* every time you roll out?” Fabricating motorcycle pegs isn’t just about slapping on some metal and calling it a day. It’s about crafting a statement, a piece of art that marries form and function in a way that makes every ride feel like a rebellion against the ordinary. But here’s the kicker: if you’ve never welded before, or if your idea of precision is eyeballing a cut, this project might just humble you. So, are you ready to turn raw metal into a ride that turns heads—or are you going to let the fear of a crooked weld win?
The Alchemy of Materials: Choosing Your Metal with Intent
Not all metals are created equal, and neither are all pegs. The first step in this forge of creativity is selecting the right material—a decision that will dictate not just the peg’s durability, but its entire personality. Mild steel is the darling of DIY builders: affordable, malleable, and forgiving for beginners. But if you’re chasing that sleek, high-performance edge, chromoly steel or even titanium could be your muse. Each has its own quirks. Mild steel bends under heat like a dancer, while chromoly demands respect—it’s tougher to work with but rewards you with a lighter, stronger peg. And titanium? Oh, it’s the prima donna of metals, resisting corrosion and shaving off weight like a hot knife through butter. But be warned: if you’re not prepared to splurge, titanium’s price tag might leave you feeling like you’ve been sucker-punched by a billboard.
Then there’s the question of shape. Round pegs are the classic rebels, their smooth curves inviting a rider’s foot to dance with the bike. Square pegs, on the other hand, are the minimalist’s dream—clean lines, sharp edges, and a no-nonsense attitude. And let’s not forget the tapered peg, a hybrid that blends the best of both worlds. Your choice here isn’t just aesthetic; it’s ergonomic. A peg that’s too wide or too narrow can turn a joyride into a foot cramp disaster. So, measure twice, cut once—or prepare to live with the consequences of your haste.
Tools of the Trade: Gearing Up for the Forge
If you think this project can be tackled with a hacksaw and a prayer, think again. Fabricating pegs is a symphony of tools, each playing its part in the grand composition of creation. At the heart of it all is the welder—a MIG or TIG, depending on your allegiance. MIG welders are the workhorses, forgiving and easy to master, while TIG welders are the precision artists, capable of stitching metal with the delicacy of a surgeon. But don’t underestimate the humble angle grinder. It’s your best friend for cleaning up edges, smoothing welds, and generally making your pegs look like they belong on a showroom floor rather than a scrap heap.
You’ll also need a drill press for those perfectly aligned mounting holes—because nothing kills the vibe of a custom chopper like a peg that’s slightly off-kilter. And let’s not forget the jigs. These unsung heroes are the difference between a peg that’s *almost* right and one that’s *exactly* right. A well-made jig ensures consistency, especially if you’re cranking out multiple pegs for a full custom setup. Oh, and a sturdy vise? Non-negotiable. Your pegs will thank you when they’re not getting mangled mid-bend.
Designing Your Peg: Where Art Meets Engineering
Before you fire up the welder, you need a blueprint—even if it’s scribbled on a napkin during a caffeine-fueled brainstorm. Sketching your peg isn’t just about doodling shapes; it’s about envisioning how it will interact with the bike and the rider. Consider the angle. A peg that’s too steep will have you hunching like a question mark, while one that’s too flat might leave your feet dangling in the breeze. The sweet spot? Typically between 15 to 20 degrees, but don’t be afraid to experiment. After all, this is *your* chopper, not a cookie-cutter clone.
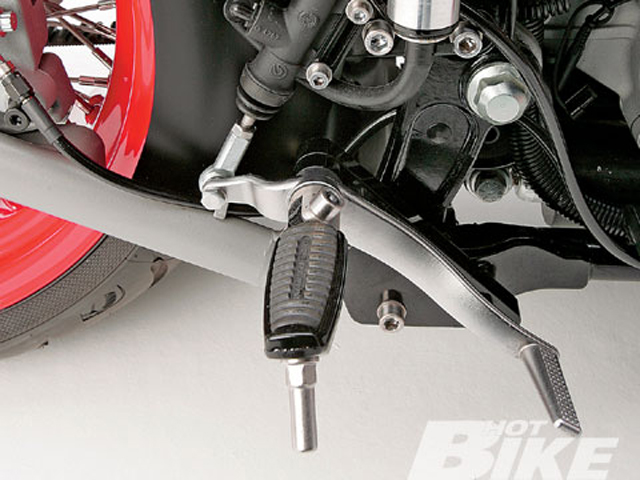
Think about the mounting points, too. Will your pegs bolt directly to the frame, or do you need a bracket to bridge the gap? And what about the footplate? A larger surface area distributes weight better, but it also adds bulk. A smaller plate keeps things lightweight but might leave your soles feeling like they’re standing on a postage stamp. Then there’s the finish. Raw metal has a certain gritty charm, but if you’re aiming for a polished look, be prepared to sand, polish, and maybe even chrome-plate. Each choice here is a brushstroke in the masterpiece of your build.
The Dance of Heat and Metal: Bending Without Breaking
Bending metal is where the magic—and the potential for disaster—happens. Whether you’re using a jig, a torch, or a hydraulic press, the goal is the same: coax the metal into submission without snapping it like a twig. If you’re working with mild steel, a simple jig made from scrap wood or metal can guide your bends with precision. But for chromoly or titanium, you’ll need to get cozy with heat. A propane torch or a dedicated heat gun can soften the metal just enough to make it pliable, but be warned: overheat it, and you’ll weaken the structure, turning your peg into a ticking time bomb of structural failure.
Patience is your ally here. Heat the metal gradually, bending in small increments until you reach the desired angle. And always let it cool before making adjustments—rushing this step is a one-way ticket to Bendgate. If you’re using a hydraulic press, take it slow. The metal will fight back, resisting your will with every micron of progress. But when the bend is just right? There’s no feeling quite like it. It’s the moment your raw materials transform into something tangible, something *yours*.
Welding with Finesse: Stitching Your Vision Together
Now comes the moment of truth: welding your pegs to the bike. This isn’t the time to channel your inner cowboy with a sloppy bead. A clean, strong weld is the difference between a peg that holds up under pressure and one that sends you flying at the first pothole. Start by tack-welding the peg in place, ensuring it’s aligned perfectly before committing to the final weld. Use a consistent motion, keeping the arc steady and the heat even. If you’re using a MIG welder, a push technique will give you a smoother finish, while a TIG welder demands a steady hand and a watchful eye.
But welding isn’t just about strength—it’s about aesthetics, too. A well-executed weld can be a thing of beauty, a testament to your skill. Grind down any excess weld, blend the edges, and polish the surface until it gleams. And don’t forget to test the welds. Give them a good yank, a wiggle, a *shake*—whatever it takes to ensure they’re not going anywhere. Because nothing ruins a custom build like a peg that decides to take an unscheduled detour mid-ride.
Finishing Touches: The Devil in the Details
The final step is where your pegs go from functional to *fabulous*. Sanding is your first ally, smoothing out any rough edges and preparing the surface for the finish. If you’re going for a raw, industrial look, a wire brush or bead blasting can add texture and depth. For a sleek, modern vibe, a good polish will make the metal shine like a disco ball under neon lights. And if you’re feeling adventurous, why not add some custom engravings? Your initials, a skull, a tribal pattern—whatever speaks to your soul. Just make sure it’s deep enough to survive the test of time (and your boots).
Then there’s the matter of mounting. If you’ve gone the bracket route, ensure it’s welded securely and aligned with the bike’s geometry. A misaligned peg can throw off your entire riding experience, turning what should be a thrill into a chore. And don’t forget to test the pegs under real-world conditions. Take your bike for a spin, feel how the pegs interact with your feet, and make adjustments as needed. Because at the end of the day, this isn’t just about building a peg—it’s about crafting an extension of *you*.
The Ride Awaits: Your Custom Pegs, Your Legacy
So there you have it—a journey from raw metal to a statement piece that’s as unique as your riding style. Fabricating motorcycle pegs isn’t just a project; it’s a rite of passage for any chopper enthusiast worth their salt. It’s about pushing boundaries, embracing the challenge, and emerging with something that’s undeniably *yours*. Sure, there will be moments of frustration, of doubt, of wondering if you’ve bitten off more than you can chew. But when you finally hit the road, your boots planted firmly on your custom pegs, every ounce of effort will be worth it.
Now, go forth and forge. The road is calling, and your chopper is waiting.