The allure of a chopper isn’t just in its raw power or its rebellious silhouette—it’s in the meticulous craftsmanship that breathes life into the machine. Among the most understated yet critical components of this transformation is the wiring harness. For those who eschew the complexity of turn signals in favor of a minimalist aesthetic, the task of wiring a basic chopper harness becomes an exercise in both mechanical poetry and practical ingenuity. This isn’t merely about connecting wires; it’s about understanding the soul of the machine, where every splice and solder point tells a story of freedom and control.
The Philosophy Behind the Minimalist Wiring Harness
In a world where motorcycles are increasingly laden with electronic gadgetry, the chopper stands as a defiant throwback to simplicity. The absence of turn signals isn’t laziness—it’s a deliberate choice to strip away the superfluous and focus on the essentials. A basic wiring harness for a chopper is a testament to this philosophy. It’s not just a bundle of wires; it’s a lifeline that connects the rider’s intent to the machine’s response. The beauty lies in its uncluttered design, where each wire has a purpose, and every connection is a deliberate act of engineering artistry.
Consider the way a vintage café racer or a classic bobber exudes a sense of raw, unfiltered connection between rider and road. The wiring harness plays a pivotal role in this narrative. It’s the unseen hand that ensures the engine roars to life, the lights flicker to life, and the throttle responds with precision. Without the distraction of flashing turn signals, the rider’s focus remains solely on the road ahead, where every nuance of the machine’s behavior becomes part of the experience.

Gathering the Tools and Components: The Essentials
Before diving into the fray, it’s crucial to assemble the right arsenal of tools and components. A chopper wiring harness isn’t built with off-the-shelf convenience in mind—it’s a custom creation, tailored to the bike’s specific needs. Start with the basics: a multimeter for testing continuity and voltage, a soldering iron for secure connections, and heat shrink tubing to insulate splices. Wire strippers, crimping tools, and electrical tape are also indispensable.
The components themselves should be chosen with care. A fuse block is non-negotiable; it’s the guardian that prevents a minor short from turning into a catastrophic meltdown. A kill switch, too, is essential—it’s the rider’s lifeline in an emergency. For lighting, opt for high-quality LED bulbs, which offer longevity and energy efficiency. And don’t forget the battery, the heart of the electrical system, which must be robust enough to handle the demands of the chopper’s electrical load.
One often-overlooked detail is the wire gauge. Thicker wires are necessary for high-current circuits like the starter motor, while thinner wires suffice for lighting and accessories. Mismatching wire gauges can lead to voltage drops, overheating, and even fire hazards. Precision here isn’t just about performance—it’s about safety.
Mapping the Circuit: Understanding the Flow of Power
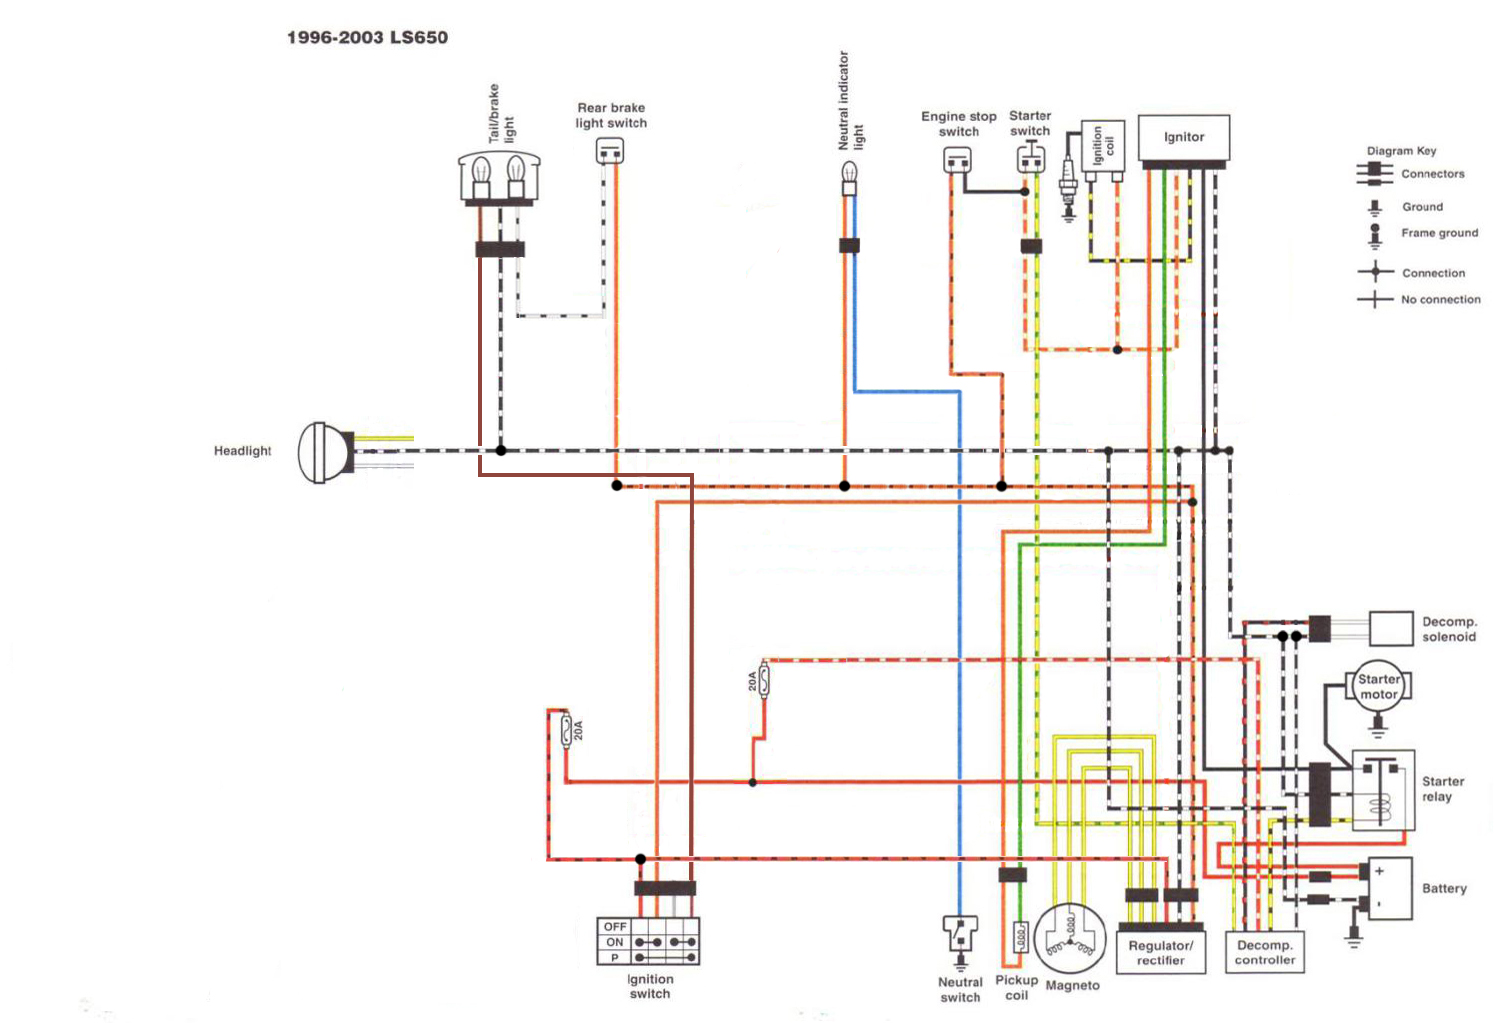
The heart of any wiring harness is its circuit map—a blueprint that dictates how power flows from the battery to the various components. For a chopper without turn signals, the circuit is refreshingly straightforward. The primary components include the ignition system, lighting (headlight and taillight), and the kill switch. Each of these must be wired in a way that ensures seamless operation without unnecessary complexity.
Begin by identifying the battery’s positive and negative terminals. The positive terminal is the starting point for all power distribution. From here, a main power wire should run to a fuse block, which acts as the central hub for all circuits. The fuse block should be mounted in a secure, accessible location—ideally near the battery to minimize voltage drop. Each circuit (ignition, lighting, etc.) should have its own fuse, sized appropriately to protect the wiring and components.
The ignition system is the next critical component. A basic chopper often uses a points-type ignition or a more modern electronic ignition system. The ignition coil, which transforms the battery’s low voltage into the high voltage needed to fire the spark plugs, must be wired correctly. The primary side of the coil connects to the ignition switch, while the secondary side connects to the spark plugs. A capacitor (condenser) is often used in points-type systems to suppress electrical noise and prolong the life of the points.
Lighting is where the minimalist approach shines. A single headlight and taillight are all that’s needed for a clean, uncluttered look. The headlight should be wired directly to the main power source, with a switch to control it. The taillight, which often doubles as a brake light, should be connected to the brake switch. This ensures that the taillight brightens when the rider applies the brakes, providing a clear signal to following traffic—even without dedicated turn signals.
Soldering vs. Crimping: The Debate Over Reliability
When it comes to connecting wires, two schools of thought dominate: soldering and crimping. Each method has its advocates, and the choice often comes down to personal preference and the specific demands of the project. Soldering offers a permanent, highly conductive connection that resists corrosion and vibration. It’s the gold standard for high-performance applications, where reliability is paramount. However, it requires a steady hand and a bit of finesse—poor soldering can lead to cold joints that fail under stress.
Crimping, on the other hand, is quicker and more forgiving for beginners. It involves using a crimping tool to compress a metal sleeve around the wire, creating a secure mechanical bond. When done correctly, crimped connections can be nearly as reliable as soldered ones. The key is to use the right size of crimp connector for the wire gauge and to ensure that the crimp is tight enough to prevent loosening over time. Heat shrink tubing should always be used over crimped connections to provide insulation and strain relief.
For a chopper wiring harness, where vibration and road grime are constant companions, soldering is often the preferred method. It ensures that connections remain solid even under the harshest conditions. That said, crimping can be a viable alternative for less critical circuits, such as lighting, where the consequences of a failure are less severe. Ultimately, the choice between soldering and crimping should be guided by the demands of the specific circuit and the builder’s comfort level with each technique.
Securing the Harness: The Art of Neatness and Protection
A well-wired chopper harness isn’t just functional—it’s a work of art. The way the wires are routed and secured can make the difference between a professional build and a DIY mess. Start by planning the route of the harness before cutting any wires. The goal is to minimize the length of runs and avoid sharp edges or moving parts that could damage the insulation. Use motorcycle-specific wire looms or split-loom tubing to protect the wires from abrasion and the elements.
Securing the harness is equally important. Zip ties are a common choice, but they can degrade over time and become brittle in cold weather. A better option is to use Adel clamps or P-clips, which provide a more secure and long-lasting hold. These clamps should be mounted to the frame or other sturdy components using bolts or self-tapping screws. Avoid using too many clamps, as this can make the harness rigid and prone to vibration-induced fatigue.
For areas where the harness passes through the frame or other tight spaces, consider using grommets to protect the wires from chafing. Grommets should be made of a durable material like nylon or rubber and should be sized appropriately for the wire bundle. Additionally, any splices or connections should be tucked away in a protected location, such as under a seat or inside a toolbox, to prevent them from being exposed to moisture or physical damage.

Testing and Troubleshooting: Ensuring Flawless Operation
Even the most meticulously wired harness can harbor hidden gremlins. Before firing up the engine for the first time, it’s essential to test every circuit for continuity, voltage, and proper operation. Start with a visual inspection, checking for loose connections, exposed wires, or signs of overheating. Then, use a multimeter to verify that each circuit is complete and that there are no shorts to ground.
Testing the lighting circuit is straightforward. With the headlight switch turned on, use the multimeter to check for voltage at the headlight terminals. If the voltage is correct, the headlight should illuminate. For the taillight, test the brake switch by applying the brake lever or pedal and verifying that the taillight brightens. If the taillight doesn’t respond, check the switch for proper adjustment and ensure that the wiring is connected correctly.
The ignition system requires a bit more finesse. If the engine doesn’t crank, start by checking the battery voltage. A fully charged battery should read around 12.6 volts. If the voltage is low, charge or replace the battery. Next, check the kill switch—it should be in the “run” position to allow the engine to start. If the engine cranks but doesn’t start, verify that the spark plugs are receiving voltage from the ignition coil. A lack of spark could indicate a faulty coil, points, or condenser (in points-type systems).
One common issue in chopper wiring is voltage drop, which occurs when the resistance in the wiring causes a reduction in voltage at the component. This can lead to dim lights, weak spark, or sluggish starter motor performance. To diagnose voltage drop, measure the voltage at the battery and then at the component. The difference between the two readings is the voltage drop. If it’s more than 0.5 volts, inspect the wiring for corrosion, loose connections, or undersized wires.
The Reward: A Chopper That Speaks to the Soul
Completing a basic chopper wiring harness is more than just a mechanical achievement—it’s a rite of passage. It’s the moment when the machine transitions from a collection of parts to a living, breathing entity that responds to the rider’s every command. The absence of turn signals isn’t a limitation; it’s an invitation to focus on the pure essence of riding. Every twist of the throttle, every flick of the light switch, becomes an intimate dialogue between rider and machine.
There’s a certain magic in simplicity. In a world where complexity often overshadows craftsmanship, the minimalist chopper stands as a testament to the beauty of less. The wiring harness, though hidden from view, is the unsung hero of this narrative. It’s the silent partner that ensures the engine purrs, the lights glow, and the ride is as exhilarating as it is unencumbered. And when the sun sets and the headlight cuts through the darkness, there’s a profound satisfaction in knowing that every wire, every connection, was crafted with intention.
For those who take the time to wire their own chopper harness, the reward isn’t just a functional motorcycle—it’s a machine that carries the imprint of their hands, their choices, and their passion. It’s a rolling piece of art, where every detail matters, and every ride is a celebration of the open road.