There’s something primal about a chopper’s oil tank—sleek, purposeful, and unapologetically raw. It’s not just a reservoir; it’s the heartbeat of the machine, a statement of intent carved from steel or aluminum. Welding a one-piece oil tank for a chopper isn’t just fabrication; it’s alchemy. You’re transforming flat stock into a vessel that cradles the lifeblood of your ride, ensuring it flows with the precision of a surgeon’s scalpel. But this isn’t a task for the faint of heart. It demands patience, a steady hand, and an intimate understanding of metal’s temperamental soul. Whether you’re a seasoned fabricator or a weekend warrior chasing the perfect custom build, mastering the art of one-piece oil tank welding will elevate your chopper from mere machine to mechanical masterpiece.
The Anatomy of a One-Piece Oil Tank: Design Principles and Material Selection
A one-piece oil tank isn’t just a cylinder with a cap—it’s a symphony of form and function. The design begins with the material. Mild steel, with its forgiving nature and weldability, is a favorite among builders, but aluminum offers a featherlight alternative for those chasing performance. The thickness of the metal is critical; too thin, and it’ll warp under heat; too thick, and it’ll resist your torch’s embrace. Most builders opt for 16- to 18-gauge steel or 0.063-inch aluminum, striking a balance between durability and workability.
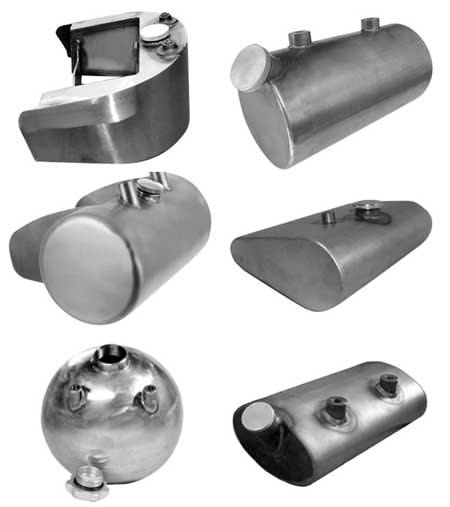
The shape is where creativity takes flight. Will it be a teardrop, a bullet, or a custom silhouette that defies convention? The tank’s dimensions must accommodate the motorcycle’s frame, the oil pump’s placement, and the rider’s ergonomics. A well-designed tank flows seamlessly into the bike’s aesthetic, its curves mirroring the chopper’s soul. Don’t forget the baffles—internal dividers that prevent oil from sloshing like a storm-tossed sea. These aren’t just functional; they’re the unsung heroes of smooth rides, ensuring your engine never gasps for lubrication mid-corner.

Tools of the Trade: Equipping Your Workshop for Precision Welding
Before you strike an arc, your workshop must be a temple of precision. A MIG welder is the workhorse of choice for most builders, its ease of use and clean beads making it ideal for beginners and veterans alike. But don’t underestimate the power of a TIG welder for aluminum or stainless steel, where control is paramount. You’ll also need a plasma cutter or angle grinder for clean edges, a slip roll for bending sheet metal, and a sturdy jig to hold your tank in place during welding. Clamps, magnets, and even duct tape can become your best friends when securing pieces in alignment.
Safety isn’t optional—it’s the foundation of every build. Invest in a high-quality welding helmet with auto-darkening lenses, flame-resistant gloves, and a respirator to shield yourself from fumes. Ventilation is non-negotiable; welding in a closed garage without airflow is a recipe for disaster. And always keep a fire extinguisher within arm’s reach. The metal may be cold, but the sparks? They’re anything but.
Pattern Drafting: From Blueprint to Reality
Every great tank starts with a pattern—a roadmap from flat stock to three-dimensional perfection. Begin by sketching your design on paper, then transfer it to cardboard or poster board to create a full-scale template. This mock-up will help you visualize the tank’s final form and identify potential flaws before you commit to metal. For a one-piece tank, the pattern typically consists of a top and bottom half, each cut from a single sheet. The seams will run vertically along the sides, hidden beneath the tank’s curves.
Precision is key. Use a straightedge and scribe to mark your cuts, then double-check your measurements with a tape measure. A single misaligned edge can throw off the entire tank’s symmetry. If you’re working with aluminum, consider using a metal scribe instead of a pen—it won’t smudge under heat. Once your pattern is flawless, trace it onto your metal sheets with a center punch to create guide marks for drilling and cutting.
Cutting and Forming: Shaping the Metal to Your Will
With your pattern in hand, it’s time to cut the metal. A plasma cutter is the fastest method, but an angle grinder with a metal cutoff wheel works in a pinch. For intricate curves, a jigsaw with a metal blade can be a lifesaver. After cutting, deburr the edges with a file or sandpaper to remove sharp burrs that could compromise your welds. Now comes the moment of truth: forming the metal into its final shape.
A slip roll is the ideal tool for bending sheet metal, allowing you to create smooth, consistent curves. Start with the top and bottom halves, rolling them into gentle arcs that will later join to form the tank’s body. For domed ends—a signature of many custom tanks—you’ll need a English wheel or a specialized doming tool. This process requires finesse; too much pressure, and you’ll thin the metal; too little, and the dome won’t hold its shape. Practice on scrap metal first. Remember, metal has memory. It will fight you, but if you coax it gently, it will yield to your vision.
Tack Welding: The Art of Temporary Perfection
Before you commit to full welds, your tank must be held in place with tack welds—small, precise spots that fuse the pieces together without warping the metal. Clamp your top and bottom halves into your jig, ensuring they’re perfectly aligned. Start with a tack weld at the center of the seam, then work outward in a zigzag pattern. This prevents heat buildup in one area, which can cause distortion. Use a low amperage setting to minimize spatter and keep your welds tight.
For domed ends, tack welding is even more critical. The curvature makes alignment trickier, so take your time. A misplaced tack can throw off the entire dome’s symmetry. If you’re welding aluminum, preheat the metal slightly to reduce the risk of cracking. And always weld in a well-ventilated area—aluminum fumes are no joke.

Full Welds: Fusing Metal with Fire and Precision
With your tank tacked in place, it’s time for the main event: full welds. Start with the vertical seams, running your welder along the joint in a steady, controlled motion. For steel, a MIG welder with a 75/25 argon/CO2 mix will give you clean, strong beads. For aluminum, switch to a TIG welder with pure argon gas, moving slowly to avoid overheating. Keep your torch angle consistent—too steep, and you’ll burn through; too shallow, and your welds will be weak.
Work in short segments, allowing the metal to cool between passes to prevent warping. Use a hammer to gently tap the seams after welding, relieving stress and ensuring a tight fit. For domed ends, weld in small sections, alternating sides to maintain symmetry. If you notice any gaps or weak spots, don’t hesitate to grind them out and reweld. Perfection isn’t achieved in one pass—it’s the result of patience and persistence.
Finishing Touches: Grinding, Polishing, and Protecting Your Masterpiece
A weld is only as good as its finish. Start by grinding down any excess metal with a flap disc or wire wheel, blending the seams into the tank’s curves. For a showroom shine, switch to a finer grit sandpaper or a polishing wheel. Aluminum can be buffed to a mirror-like finish, while steel can be treated with a bead blaster or chemical etch for a satin look. Don’t forget to clean the tank thoroughly—oil residue and metal shavings are the enemies of a smooth finish.
Protection is the final step. Apply a high-temperature primer to prevent rust, followed by a durable topcoat in your chosen color. Powder coating is a popular choice for its durability and vibrant hues, but paint can also achieve stunning results with the right preparation. If you’re feeling adventurous, consider adding custom graphics or engravings to make your tank truly one-of-a-kind.
Testing and Installation: Ensuring Your Tank is Road-Ready
Before you bolt your tank onto your chopper, it must pass the ultimate test: the pressure test. Fill the tank with water (never oil—it’s a fire hazard) and pressurize it to at least 10 PSI. Watch for leaks, paying close attention to the seams and domed ends. If you spot any drips, mark the spot and reweld. Once the tank holds pressure, drain it and let it dry completely. A single drop of water left inside can contaminate your oil and wreak havoc on your engine.
Installation is where your tank transitions from a standalone piece to a vital component of your chopper. Position it carefully, ensuring it aligns with the frame and doesn’t interfere with the rider’s legs or the bike’s suspension. Use rubber grommets or vibration-dampening mounts to reduce noise and stress on the welds. Secure it with bolts or brackets, but don’t overtighten—you want the tank to flex slightly with the bike’s movements.
Troubleshooting Common Pitfalls: When the Metal Fights Back
Even the most seasoned builders encounter challenges. Warping is a common foe, often caused by uneven heat distribution. To combat this, weld in short bursts and allow the metal to cool between passes. If your tank develops a twist, a heat gun or torch can help realign it—just be gentle. Weak welds are another nemesis, usually the result of dirty metal or improper settings. Always clean your metal with acetone or a wire brush before welding, and adjust your amperage to match the thickness of your stock.
Cracking is a nightmare, especially with aluminum. Preheating the metal and using a filler rod with a lower melting point can help prevent this. And if your tank ends up with a gap that’s too large to bridge, don’t panic—sometimes, the best solution is to start over with new metal. There’s no shame in scrapping a piece that refuses to cooperate; it’s all part of the journey.
The Reward: A Tank That’s More Than Just a Tank
When you finally hold your finished oil tank in your hands, you’ll understand why builders chase this craft. It’s not just a component—it’s a testament to your skill, your patience, and your passion. Every curve, every weld, every polished inch tells a story. This tank will cradle the lifeblood of your chopper, ensuring it purrs like a contented cat on the open road. And when you fire up the engine for the first time, knowing that you built this piece with your own two hands, the thrill will be unlike anything else.
So go ahead—roll up your sleeves, strike that arc, and let the metal sing. Your chopper’s soul awaits.